 Click any image to enlarge
You would fully expect that a company as large as FUSO/Mitsubishi would invest a considerable amount of time, effort and money into the research and development of their components in order to produce high quality, durable vehicles. I would too, but I must admit that since buying my truck I have questioned this on several occasions.
From the first day I got my truck home I noticed things that I was not overly impressed with.
There were sections at the rear of the cab (in the area where the cab latches), where some of the sheetmetal overlapped, that had obvious signs of rust. I neutralised and halted this rust by using some industrial strength rust converter, but I was surprised that in this day and age of vehicle manufacturing that this problem would exist on a new vehicle.
The same could be said of the way the chassis is manufactured. The bare metal sections are all riveted together and only then is the finished assembly painted. One of the problems with this approach is that paint cannot get into all of the little nooks and crannies. If any of the chassis bolts are removed you will find bare metal under the bolt heads or nuts. Many manufactures these days fully submerse their chassis components in anti corrosive baths prior to painting, but unfortunately it would appear that Fuso is not one of those companies. Sigh…
As part of my regular maintenance regime I recently noticed that the rubber on both the gearbox and transfer case breathers was cracked. The OEM breather arrangement is a fairly simple one: A stepped rubber grommet fits into the gearbox/transfer case casting. Fitted in the grommet is a short length of 8mm tubing, bent at 90°, to which the breather hoses are connected. Sadly, these grommets are destined to fail in a relatively short period of time. If they were fitted with a simple spring clamp, as used on the fuel lines, this would greatly reduce the likelihood of the rubber splitting, but they aren’t. When I contacted my local Fuso parts dealer to enquire about replacement breathers, I nearly fell over when told that the breathers cost $115 each! That is absolutely ridiculous for a piece of rubber fitted with a bent piece of tubing.
There was no way I could justify that sort of money for something so basic, so I looked at what alternatives I could use.
Initially I was going to replace the OEM rubber grommets with nylon grommets, but scrapped that idea after trying some prototypes.
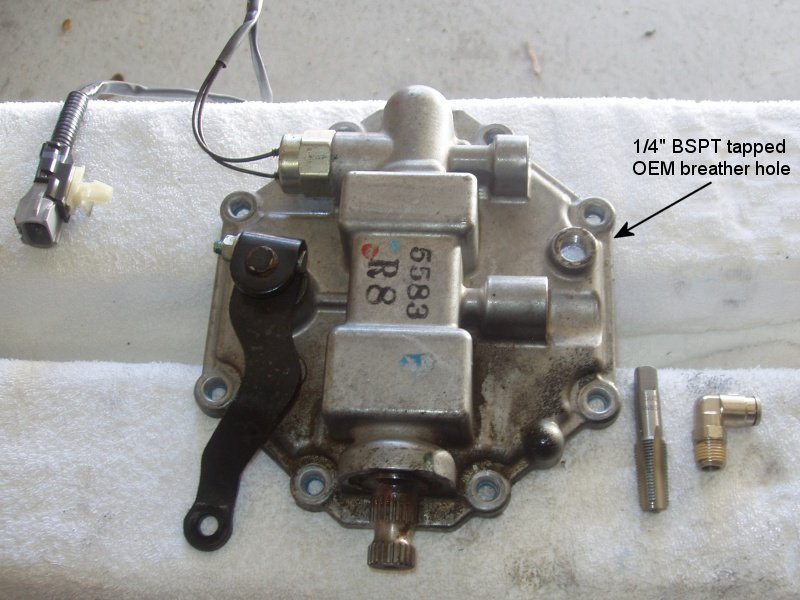
Another option was to replace the OEM breathers with metal push lock fittings, but this would involve disassembling parts of the gearbox and transfer case in order to tap the required ¼” BSPT holes. Obviously, tapping the holes without removing the casings was not possible, as there was no way of preventing aluminium swarf going into the gearbox or transfer case. I had to think hard about going down this path, because it meant breaking the factory seals on a box that had only done 4000 Km, but in the end that’s what I decided to do. This decision was made a little bit easier, given that the truck is no longer under warranty.
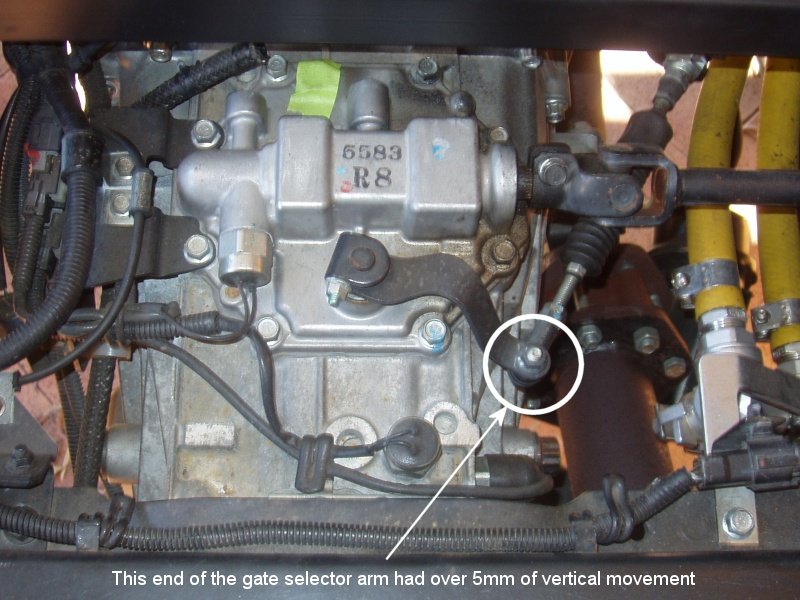
During the process of removing the upper gearbox casing I noticed that there was a considerable amount of play in the gate selector shaft. There was more than 5mm of movement at the end of the selector arm, which definitely did not seem right to me, especially given that this gearbox is virtually brand new. I contacted my local Fuso service centre and discussed this issue with them. To cut a long story short, Fuso Australia replied saying that they would not cover the costs of replacing a “wear and tear” part. Did I mention that my truck has only done 4000 kilometers??? Apparently, that did not matter to Fuso Australia, which I must admit, pissed me off somewhat.
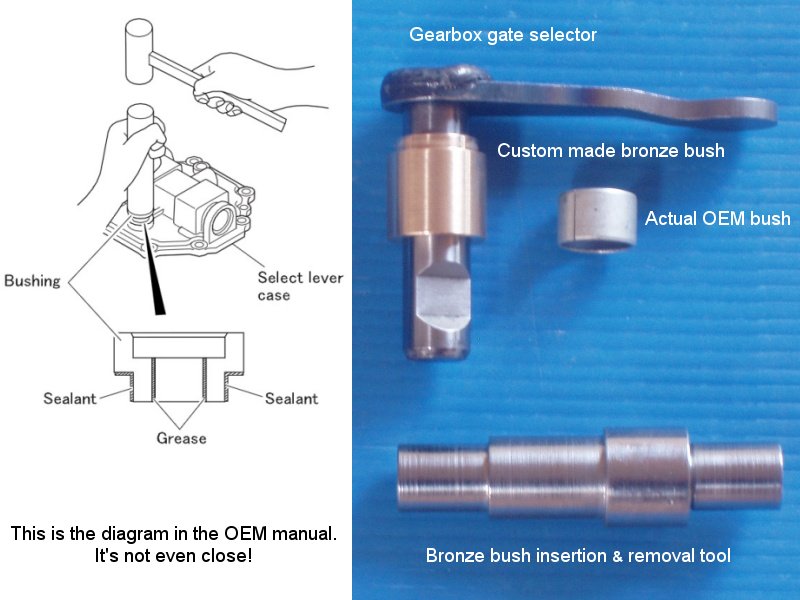
Anyway… I bought a new seal and bush so I could fix the problem, figuring that something had to be done about this excessive play, as it was only going to get worse, not better. After removing the gate selector arm from the casing it was quite obvious why there was so much play. The play was not caused by a worn bush, it was caused by a questionable design. The OEM bush was only about 10mm long, which did not give anywhere near the amount of support required for the selector shaft. Replacing the existing bush with an identical one seemed pointless, so I decided to modify the casing to take a longer bush. The only issue with this approach is that there is no going back after doing this.
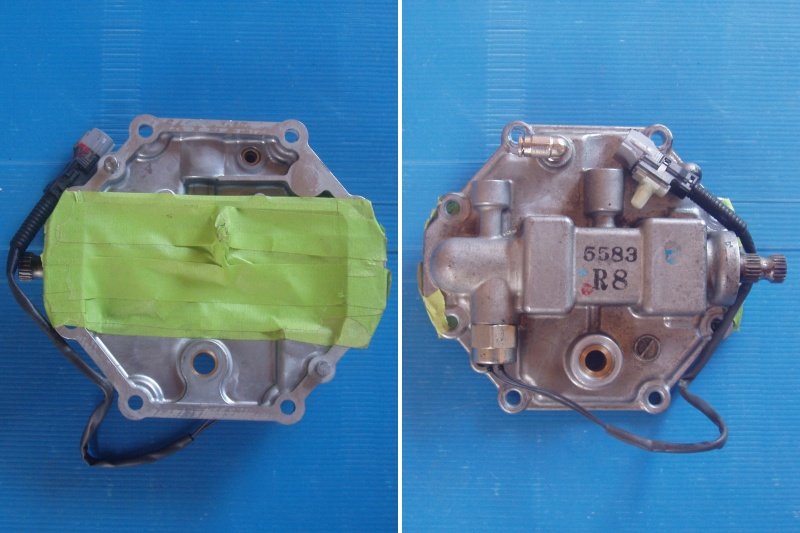
I covered the selectors that were in the casing, so that no machining swarf could enter the mechanisms, as this was much easier than taking them out. Using a milling machine and two end mills (16mm and 19mm) I machined out the existing bush and created a rebate to house a new bush. Two stepped replacement bushes were machined from leaded bronze (LG2), so that I would have one to fit and another as a spare. Because I do not like the idea of press fitting into aluminium, the bush was made as a slip fit into the casing and it was secured with Loctite 243. My new bronze bush is 19mm long, which gives the gate selector shaft twice the support of the original OEM bush.
With the gearbox modifications completed, the next challenge was replacing the transfer case breather. I thought that this would be a simple task, as the transfer case end plate was only held on with four bolts. After undoing these bolts I used a hammer and a piece of timber to break the silicone gasket seal. After the seal was broken I was able to rotate the casing slightly, but it was firm and I did not feel comfortable progressing further, so I put the bolts back in and tightened everything back up.
I now had a bit of a problem… the seal on the rear casing had been broken, so it might leak, and I still had not replaced the OEM breather.
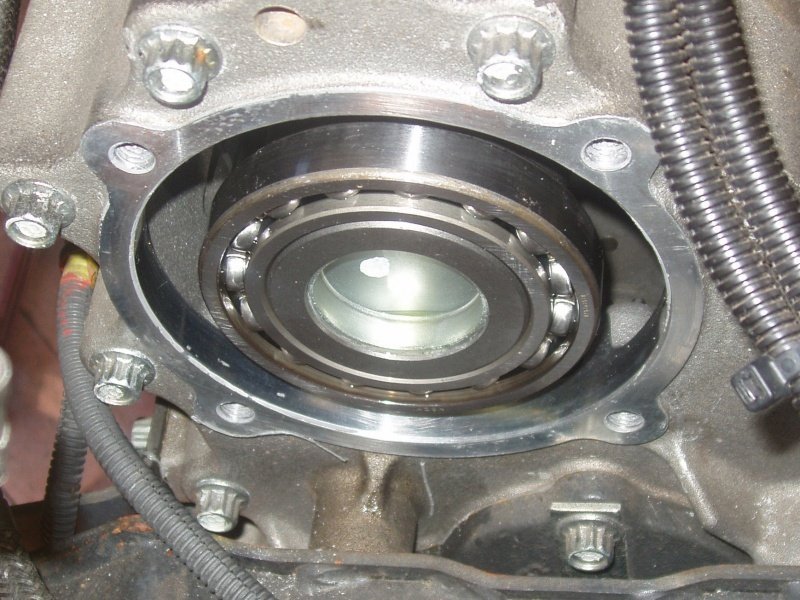
The drawings in the workshop manual were not descriptive enough for me to know exactly how the casing was being held in place, so I contacted a few people I knew to see if they could offer any advice. After being sent an image of an end casing that had been removed from a similar transfer case (thanks John) I could see that the casing was the support for the rear, upper transfer shaft bearing. This is what I thought it would be, so having confirmation of this I was now confident enough to have a second attempt at removing the casing.
After undoing the bolts again I used a soft hammer, a piece of timber and few different sized screwdrivers to gently work the casing off. The hammer and timber were used to rotate the end casing into a position where I could put a screwdriver between one of the four end casing lugs and the transfer case body. Rotating the casing backwards and forwards, and using very gentle pressure on diagonally alternate lugs with the screwdrivers, the casing was slowly edged backwards until the casing was off. Patience is definitely required for this task.
With the casing removed it was a simple task of tapping the hole and screwing in the push lock fitting. Cleaning off all of the silicone sealant was a bit of a pain, as anyone having done this previously would know. Wouldn’t it be nice if there was a simple solvent for silicone? Alas, nothing seems to work overly well for this job. Anyway… after a bit of time with a razor blade and some thinners, everything was clean.
New RTV silicone was applied to the end casing and it was tapped back into position and the bolts were done up. All done… all good.
If you could not understand some of my descriptions, here are a few images that may help…


I’d like to think that this is the last bit of re-engineering that will need doing, but sadly, I am not confident that it will be.